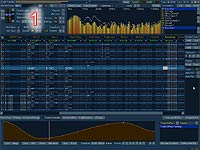
Панель секвенсера позволяет настраивать основные параметры модуля - скорость BPM и список в любом порядке паттерн, звучащих в модуле.
Рисунок. Сверху-вниз, слева-направо.
Top status line
Audio VU (Volume Unit) - meter which indicates the played Volume. If
the background color of the VU changes, that means that volume clipping
has occurred (the digital volume is much louder than the maximum level and
therefore sounds distorted). In that case you have to turn down the Master
Volume. Top status
line Panic - turns off audio, stops MIDI and song playback. Use it when
you over-tweak effects and they start ringing in your ears and you can't
find quick way to stop this mess - the button name says it all - panic! Top status line meters
- shows Sync / MIDI in/out status, elapsed song time, CPU usage and buttons
for minimize / windowed-full screen toggle and exit button.
Master Volume - Master volume of your song.
Lower it if you experience clipping or digital distortion caused by too
high volume. AD
- Auto Decrease master volume after distortion has been detected. AD always
lowers the volume after clipping detection only. To increase the volume
you have to do it manually with the given slider. Buttons with icons - Play button, Loop pattern
(if pressed), Stop, Edit/Record mode toggle
Ins/Del - Insert / Delete Pattern in current
Song position. <
> between Ins/Del - Change Pattern number in current Song position.
Can be also changed by clicking on the Pattern numbers directly with your
Left/Right Mouse buttons (on each digit). Clone-Button (below Del) - Copies the current
pattern and pastes it into the next free available pattern. Further it inserts
the newly created pattern below the currently selected play list row. Sequencer
scroll bar - Scroll through your Pattern Arrangements. You can also
scroll by clicking on the Position Numbers in the sequencer list.
Song
Length - The Length of your Song (number of Pattern Positions) Pattern
Lines - Current Pattern Length in lines (default is 64 dec=40 hex
- which gives 16 beats on 4/4 measure). Repeat Pos - Indicates the Position which your
Song should restart from as soon as your Song has reached it's end. Ptr->
[Cur] / [Song] / Sort - [Cur] equals the current Song position to
the current pattern. [Song] sets all Song positions to the current given
pattern. The Sort option cleans up and rearranges Patterns in ascending
order. (the Song Contents remain unchanged).
Key Jazz - Turns on/off polyphonic playback
of pressed keys (try playing chord with Key Jazz on and off). rec NoteDelays - When live-recording into the
pattern, this feature will enable automatic note-delay-effect insertion,
so the notes you played wont be quaninized to pattern-lines but rather to
ticks. Alloc
Rows - Insert notes in additional note columns in pattern editor
when recording keys. Like Key Jazz but for recording mode. Octave - Currently selected Octave for Virtual
Piano Keyboard keys. Edit Step - Specifies the number of lines
the pattern editor will move down when you enter or delete notes manually.
For example: if set to 3, pattern editor will jump 3 lines down instead
of only one line.
Ptrn Follow - This option can optimize Video
redraw if your Graphics Card is too slow. It draws only a line which follows
playback of your Song rather than scrolling whole patterns. Ptrn Follow
On = FT2 like / Ptrn Follow Off = IT like. Ext. Sync - MIDI clock sync as Slave. MIDI
clock is only accepted when the Ext. Sync is set to On. BPM/Speed - Set song BPM (Beats per Minute).
One beat is one bassdrum kick. Speed is a speed factor as known from Amiga
trackers or FastTracker2. Loop Block, 1/4 Pattern - If your pattern cursor
is located in the first 1/4 of a pattern and you turn on Loop Block it will
loop only the first 1/4 of pattern which is good for testing purposes. If
you disable Loop Block, move cursor to 2/4 of a pattern and turn it back
on it will loop this 2/4 of a pattern. You can use 1/2 to 1/8 of a pattern
to loop this way. For regular playback again turn loop block off.
Using Position Editor
If you are new to Renoise you might want to get familiar with Renoise's
Pattern editor. Using only the pattern editor
you can compose simple 1-pattern songs without knowing anything about Renoise's
Position editor.
After you have entered some Notes in a Pattern that is assigned at the beginning
(pattern 00) to Song position 00 you can hear them by pressing the Play
button. Then if you wish to add more Patterns to your Song, simply click
the Ins button. When you activate AD,
it will always reduce maximum volume to fit maximum volume without digital
distorting the mix. Before you render your song to a WAV file, you should
play the whole song once with (AD) Enabled,
to let Renoise find the maximum volume peak and adjust the master-volume.
You should also disable DeClipper (Master Track - Track DSP's/Settings)
before doing that. You can use the Sort option
to rearrange patterns in increasing order without affecting how the song
will sound.
Key Jazz and Alloc
Rows can help you in testing your chords or to record them. However
if you wish to use only one note at the time or record only one note at
the time, turn these options off.
1 pattern line has 6 ticks. You can use ticks for retriggering or note-delaying
during one pattern line (see module Tutorial1.rns).